Recently, I decided to move my website from Wordpress to a Jekyll and GitHub Pages. As you can see, my website is quite simple: a few posts and a couple of fixed pages. Jekyll and GitHub Pages make a very good job in accommodating my needs.

However, it can be a bit tricky setting up everything. In this post I would like to share a quick guide on how to set everything up.
Installation
- As mentioned in the official Jekyll documentation, first install a
Ruby+Devkitversion from RubyInstaller Downloads. Use the default options for installation. Make sure thatMSYS2andMINGWare installed as well (see Tips, Tricks, and Troubleshooting if they don’t) - Open a new command prompt (in admin mode) and install Jekyll and Bundler using
gem install jekyll bundler - Check if Jekyll was installed properly using
jekyll -v. You should see as an output something likejekyll 4.0.0 - Perform a bundle update typing
bundle update - Navigate to the directory where your website files will be located (e.g.,
C:\Users\website\) and install GitHub Pages typinggem install github-pagesor copy and paste the files from a template. - The
Gemfileshould have the following content
gem "github-pages", group: :jekyll_plugins

# Plugins go here.
group :jekyll_plugins do
    gem "jekyll-paginate", "~> 1.1.0"
    gem 'wdm', '>= 0.1.0'
end
If you are using a template, you might have to adjust them appropriately. For instance, the Gemfile of the template I used looks like this:
source "https://rubygems.org"
ruby RUBY_VERSION

# Hello! This is where you manage which Jekyll version is used to run.
# When you want to use a different version, change it below, save the
# file and run `bundle install`. Run Jekyll with `bundle exec`, like so:
#
#     bundle exec jekyll serve
#
# This will help ensure the proper Jekyll version is running.
# Happy Jekylling!
#gem "jekyll", "4.0.0"

# If you want to use GitHub Pages, remove the "gem "jekyll"" above and
# uncomment the line below. To upgrade, run `bundle update github-pages`
# (or `gem update github-pages` if you used a gem instead of a bundle).
gem "github-pages", group: :jekyll_plugins

# If you have any plugins, put them here!
group :jekyll_plugins do
    gem "jekyll-paginate", "~> 1.1.0"
    gem 'wdm', '>= 0.1.0'
end
Notice that since I am using GitHub Pages, I commented the line gem "jekyll", "4.0.0" and uncommented the line gem "github-pages", group: :jekyll_plugins.
Adding/updating content
- Navigate to the directory where your website files are located (e.g.,
C:\Users\website\)
Locally
- Type
bundle exec jekyll serve. This will launch a local server athttp://localhost:4000/. Here, you will see the changes that you make to the website (locally).
Online
- If you are happy with the changes, just push them to GitHub
git add ...git commit -m "Commit message"git push -u origin master
Setting up a computer for updating an existing website
- As mentioned in the official Jekyll documentation, first install a Ruby+Devkit version from RubyInstaller Downloads. Use the default options for installation.
- Open a new command prompt (in admin mode) and install Jekyll and Bundler using
gem install jekyll bundler - Check if Jekyll was installed properly using
jekyll -v. You should see as an output something likejekyll 4.0.0 - Install the bundler using
gem install bundlerandbundler install
Tips, tricks, and troubleshooting
- The
_sitefiles are in the.gitignorebecause they are generated every time that the site is updated. Once in GitHub Pages, these files are generated based on the web content. There is really no need to push them at all. - To change the code (color) theme:
- Go to this gallery of CSS themes for the Pygments syntax highlighter used by Jekyll (by
jwarby) - Choose a theme
- Got to
assets/partials/_syntax.scssand replace the content with that of the chosen theme - Additionally, add the line
.highlight {background: #fff; border: 1px solid $grey-color-lightest; padding: 15px;}at the beginning to keep the box - If you get the error
SyntaxError: /Users/taylor/Projects/personal_website/_plugins/generate_categories.rb:50: else without rescue is useless ...L = ”” if (BASEURL == nil) else BASEURL end ... ^~Go to
_plugins/generate_categories.rband change the lineBASEURL = "" if (BASEURL == nil) else BASEURL endto
if (BASEURL == nil)
  BASEURL = ""
else
  BASEURL = BASEURL
end
- Go to this gallery of CSS themes for the Pygments syntax highlighter used by Jekyll (by
-
If
MSYS2orMINGWare not installing properly as part of the base installation When installingRuby+Devkit, you should also installMSYS2orMINGWin order to be able to compileRubyextensions. However, I’ve experienced that some times the installer gets stuck and you see something like this: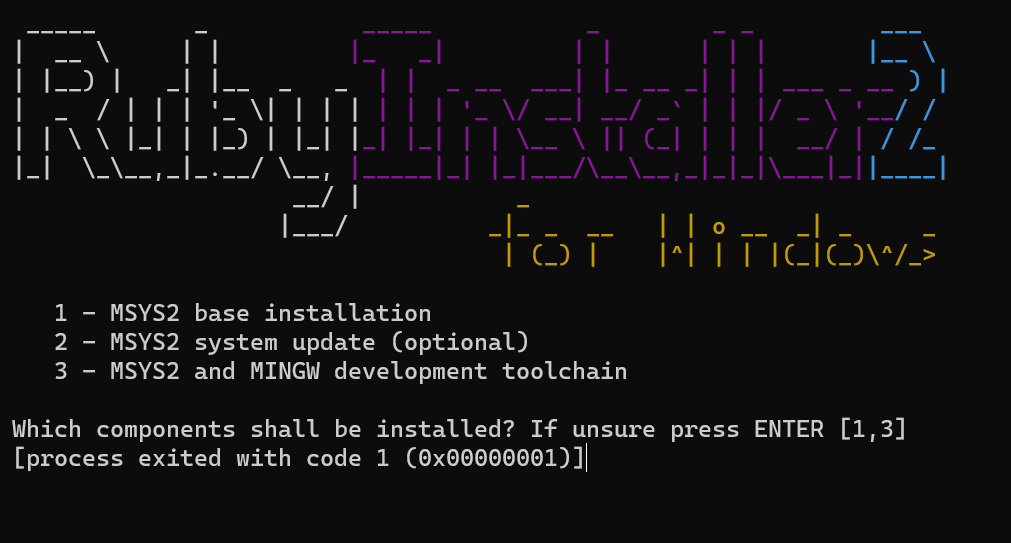
You are supposed to choose option
3, but the terminal crashes and you can’t choose anything at all. In that case, you need to install things manually. To do so, follow the official instructions. In short:- Download the installer and run it
- During the installation process, you will be asked for the desired installation folder. It is recommended that you stick with the original. If you want a different location, make sure that it a short ASCII-only path on a NTFS volume, that it has no accents, no spaces, no symlinks, and that it is no subst or network drives, no FAT.
- At the end of the installation, make sure to run
MSYS2now. This will open anMSYS2s terminal. - Update the package database and base packages by running in said terminal
pacman -Syu - This will close the
MSYS2terminal when it is done. Opening it again by runningMSYS2 MSYSfrom the Start menu (in a Windows machine) and run once againpacman -Syu - Lastly, you need to install some additional tools and
mingw-w64 GCCto start compiling. You can do so by runningpacman -S --needed base-devel mingw-w64-x86_64-toolchain
Additional resources
Please note that this quick guide is by no means meant to be exhaustive. If you want to know learn more about the involved components, take a look at these additional resources:
- Working with GitHub Pages (official documentation)
- How do I order pages in the side bar?
- How can I add Jekyll Tags using GitHub Pages?
- How can I add Jekyll Tags using GitHub Pages automatically?
- Updating dependencies for GitHub Pages using Jekyll
- Installing MSYS2 (official documentation)
If you have any comments, questions or feedback, leave them in the comments below or drop me a line on Twitter (@amoncadatorres). Moreover, if you found this useful, fun, or just want to show your appreciation, you can always buy me a cookie. Cheers!